Tuesday, January 24, 2006

pier one tray entable
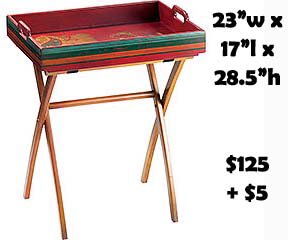

This gorgeous tray table from Pier One runs an excruciating $130 including shipping. It can however, be made for as little as $25 and serve as an adorable end table or serving tray. Here's how!

You can find tray tables with flat tops at department stores like Walmart and K-Mart and Target, individually for as little as $20 for a set of two (sometimes less!). That will be the base to which you'll apply a breakfast tray like you see in the photo to the left.

You can often find breakfast trays like that at places like garage sales, thrift stores, or flea markets. It doesnt have to be decorative... as a matter of fact, for this project, if its weathered or beaten up, it may even just add that little bit of character that you need for the project. Plan on bargain hunting and finding a nice one for no more than $5. If you cant find one you like, keep hunting at department stores, and try to stay under $10-15 (your total cost will go up but will still be SIGNIFICANTLY less than Pier One charges!). *REMEMBER* - you will want to measure your tray table to make sure that your breakfast tray is at least the width and length of the tray. Its fine if its bigger than the tray, but smaller will not work.

Once you have your breakfast tray and tray table, you'll need to attach the two! Because breakfast trays are often very thin on the bottom, it would be very difficult to attach it without having nails or screws showing through. SO, for this project, we're going to use an adhesive called "Liquid Nails." Its wonderful stuff, that you can find in any home improvement section or store for next to nothing. Simply follow package directions and attach the breakfast tray to the tray table.

To get the look you want, use any acrylic craft paints you have on hand to distress and color the tray. Dont forget to use sand paper to distress it a bit, and add some character. You can use stamps, photos, or decoupage to decorate easily and for next to nothing.

Have fun making this little project and you'll save a bundle decorating your home!

Saturday, January 21, 2006

Sports Themed Drawer Pulls


We all like that taylored look that comes from having the little touches "just right" in a room. In a child's room for example, detailed drawer pulls really make the dresser or desk look fancier, and personalized to their taste (the great thing? you can change them out easily when tastes change!). You can also

These particular knobs to the left are from Pier One Kids. They run $5 for a set of two and the cost for these doesn't even cover shipping. After those costs we're talking a minimum of $10-12 (depending on shipping costs) for two drawer pulls! For a set of six, which is the MINIMUM you would need for a standard dresser, you'll be paying around $22.

at VanDykes.com you can get the same knob for 49-cents a piece if you buy 10 of them. If you want to buy less than that, they're still a steal at 59-cents each ($3.54 for 6) http://www.vandykes.com/product/02221919/ - STILL - i would reccommend going to your local hardware store like Home Depot or Lowes so that you dont have to pay for shipping ($6.50 from VanDykes.com!)

Next, pick up a small 2oz bottle of acrylic craft paint from your local craft shop and a black sharpie marker. Together this should cost you no more than $3 and will be more than enough for this project (and plenty to use later on other projects to save more money!).

You'll need to pick up a pack of screws (measure the width of the front panel of the drawer you are adhering the pulls to, and buy a screw that is approximately 1/2" longer than that width). This should be around 50-cents for a packet that will work for this project.

Once you have your supplies, you'll need to coat the wooden pulls with the paint you purchased. Make sure to do a second coat to get a really crisp look! After it has dried, use your sharpie marker to draw designs on the drawer pulls to fit the "ball" you are wanting to mimic. Once you've completed this step, place the drawer pull on the outside of the drawer, over the drilled hole, and then place the screw through the back of the drawer, and screw into place until the pull stops turning and is flush with the drawer face. Repeat with other pulls and vuah-lah! You now have a tailored decor for any little boys room or any sports enthusiast.

At a cost of just over $7 for 6 pulls, you more than beat Pier One Kids at their price of $22!

Child's Easel from Pier One


Today we're going to be finding a way to make a child's easel for literally HALF the price of what you could buy it for at Pier One. True, there's time and labor involved, but since when has that stopped the avid crafter? :D

Below you will find a link with plans and a list of materials to make an easel almost exactly like this one, only the one you have plans for will actually fold up nicely and fit right under the bed when its not in use! Handy!

For half the cost of what Pier One charges (not including shipping!), you can create an art station for your child that will not only inspire them to create, but will send them the message of your labor of love.

http://www.woodworkersworkshop.com/cached_files/9707_files/

Tuesday, December 27, 2005

Feather Wreath


First of all my apologies for being behind!!!

#1 - my Camera cord is broken at the moment and i'm going to have to get it replaced after ordering a new one from Fugi (which will take a while *sigh!*).

#2 - I am going to be taking items that cost us more money than they should, that we love, that we want in our homes, and finding cheaper ways to make them. Be watching for ideas on how to copy merchandise from manufacturers such as Pottery Barn, Pier One, and many others!!

This particular project is a Pottery Barn creation. We will be finding a way to create this look for less! Check out this $49 feather wreath, great for winter!


To start you will need a wreath base that you can pick up at any craft store for under $5 in either foam or grapevine. I prefer grapevine for this project because of its strength and the ability to wrap wire around the twigs. Secondly, as I mentioned, you will need wire. You can use any thin florists wire. You can find this for about $1 at craft stores in small quantities. Lastly you will need 3-4 faux feather boas. You can use white as it shows in this photo or you can use multi-colored to match your decor and various holidays (think pastels for easter, orange and black for halloween, red white and blue for patriotic holidays, etc). I like to buy my boas at the dollar store in the childrens costume section but you can also find them in craft stores generally for $1-2 each. The total cost for this project: max of $14 (compare to the Pottery Barn price of $49!!)

Once you have all your supplies together you will want to wrap wire around the end of the boa, and then "tie" it to the back of the wreath. Wrap the boa around the wreath, through the hole and around the outside continually, completely covering the wreath. Occassionally "tie" the boa to the back of the wreath around one of the twigs and the boa itself. Because this is the back of the wreath it wont matter if some of the wire shows, though chances are it will be hidden from view by all the feathers.

Once you have completely covered the wreath, tie off the end with wire onto one of the twigs on the back of the wreath. Create a "hanger" for the wreath by fashioning a large "v" out of wire and attaching the ends to twigs in the wreath. Hang and enjoy!

This "little thing" is easy and fun to make, and is approximately 25% of the retail cost if buying from one of the pricier more trendy stores.

Friday, December 23, 2005

Decorative gift tags


This is a fairly simple idea with innumerable interpretations and variations!

I created these tags a while back out of some of my favorite paper made in africa by a community that supports itself by making and selling this paper. I incorportated stickers, some patterned papers, leather accents, and even staples and ribbon. You dont have to be as elaborate with your designs, and can make tags out of anything you have laying around, including wrapping paper, decorative napkins, paper plates, chipboard, book pages or newsprint, magazine clippings, or even photographs. Let your imagination go wild, and simply attach to your gift with a ribbon, and write your "To: / From: " on the back of the tag for a unique gift card.

Your gift will have the prettiest "little things" of the season!

Thursday, December 22, 2005

Matchbook Organizer

I created this organizer with 20 matchboxes - a cost of about $1.50 at walmart. I also used one of my favorite items: chipboard (which again you can get from anywhere... cut up mailing boxes or cereal boxes even so that you can essentially get this item for "free!") I covered the individual boxes with a total of 2 sheets of patterned paper. I glued the boxes together - 4 sets of 5 boxes 1 on top of another. Then I punched holes in the front of the part of the box that slides out. I tied ribbon in a knot through the holes (you can get a skien of ribbon for 50-cents or buy by the yard - you will need only one yard for this project). Then I matched the back of the boxes at a 90* angle with the front of another set of boxes. Repeat this until you have a square. I used a fast setting white glue like elmers to attach the boxes easily and permanently. I cut the chipboard to size on the top and on the bottom, and then covered it with patterned paper. After I glued on the top my box was ready to go with 20 small drawers for jewelery or small craft supplies! It makes a wonderful desktop gift or a sweet present for a female who has a lot of jewelry :)

I love how this orgnaizer helps me keep track of my "little things" :)

Wednesday, December 21, 2005

Chore Box Cleaning System


This is my home cleaning system! This was inspired by some of my friends from a message board I post on :) Thanks girls! It works by setting up a card system with all of the chores I have to do for the day. I have set it up to divvy out chores for everyday, then individual ones for Monday through the weekend, and then chores that only need to be done several times a year. This makes it easy for me to keep track of what I have left to do and what has been done! It has helped significantly to make cleaning easier for me, and this cleaning box almost makes it fun!!

I started this project by using a recipe box that I picked up at the dollar store for $1. I covered the box with one sheet of my favorite patterned paper (again check out www.rememberthemoments.com for an awesome inexpensive selection or go look in your local craft store!) I used an ink pad I had on hand to distress the edges a bit by simply rubbing the inkpad along the sides.

To make the dividers I used chipboard and cut them 3x4 1/2" “ and added a tab to be able to label the sections for easy access to the file I need. You can find chipboard in all kinds of places. You can buy it from your local office supply store, or you can cut up cereal or baking boxes and use that for your chipboard as well. I left mine “raw” but you can also paint it or cover it in your favorite papers.

For the cards, I used some of the white cardstock that I had on hand and cut to size (in this case 3.x4 1/2 ), though you could juts as easily use index cards that you can pick up in the office supply sections for under $1. I inked the edges of the cards with an inkpad and stamped the chores that I need to do on the cards and filed them appropriately. You can print them off on your computer or write them by hand as well for a personal touch!

I loved how this “little thing” helped me keep my house looking much nicer and more put together every day.

Monday, December 19, 2005

Sock Snowman Gift

Image hosted by Photobucket.com

My friend LeAnn made this beautiful example. Whether you're loving this little guy to give to friends, or to make a cluster of them for a decorative snowman family for your own holiday decorations, this snowman is a piece of cake to make and the price is sweet too!

To make, she used an old tube sock that had lost its mate to the dryer monster (you know the one... he eats all the pairs to your socks and leaves you with just one of every pair you own!). She flipped the sock inside out and stuffed about half full of stuffing (you can buy a large bag for about $1.99 at Walmart or simliar stores and save the extra for later projects!!). She used fabric scraps she had on hand to fashion a scarf for her snowman and tied it loosely around the "neck" area. She then painted a screw an orange color, and pushed it through for the nose of the snowman. She simply embroidered on the eyes by sewing black thread through the sock several times. Then she stuffed a ball shaped piece of stuffing into the sock, and tied it off just above it using a rubberband. Now she had the head and the body of the snowman with a cute scarf, nose and eyes! She flipped the rest of the sock over to make the hat, and tied the very top of the hat with some raffia. Simply cut out a few patches or hearts from scrap fabric and attach at various places on the snowman and vuah-lah!

I thought this "little thing" was far too cute not to share! :)